In a previous article How to: Install Active Directory Domain Services (AD DS) with a New Forest | Best Practices , we installed Active Directory Domain Services (AD DS) for a new forest, step by step, and to complete the topic, we will do the same installation, but using the PowerShell command line.
To install Active Directory Domain Services (AD DS) with a new forest using PowerShell and set the domain name as welcomeadmin.local, follow these step-by-step instructions:
In this article
Step 1: Prerequisites
local Administrator password must meet requirements
Verification of prerequisites for Domain Controller promotion will be failed. if The password of local Administrator account that will become the domain Administrator account not meet requirements. so you should change it Or run this commend1
1 | net user Administrator /passwordreq:yes |
Rename Server
1 | Rename-Computer -NewName DC01 |

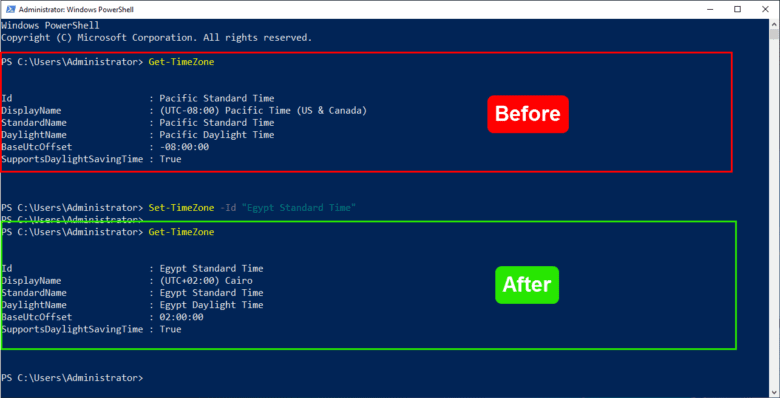
Configure Time Zone
1 2 | Get-TimeZone Set-TimeZone -Id "Egypt Standard Time" |
Verify Time Zone:
1 | Get-TimeZone |
Configure TCP/IP
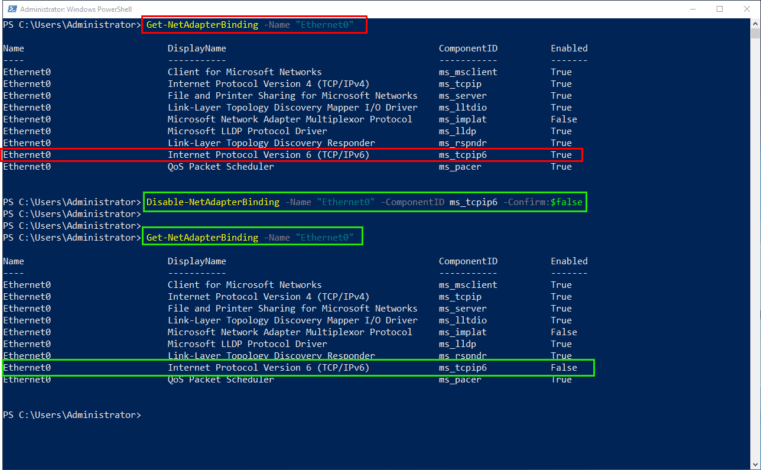
- Uncheck IPv6 on TCP/IP settings in Windows Server, you typically go through the network adapter properties. Here’s how you can do it:
1 2 | Get-NetAdapterBinding -Name "Ethernet0" Disable-NetAdapterBinding -Name "Ethernet0" -ComponentID ms_tcpip6 -Confirm:$false |
- Set IP Address, Subnet Mask, and Gateway
1 2 3 4 5 | $IPAddress = "192.168.0.5" $SubnetMask = "255.255.255.0" $Gateway = "192.168.0.1" New-NetIPAddress -InterfaceAlias "Ethernet0" -IPAddress $IPAddress -PrefixLength 24 -DefaultGateway $Gateway |
OR
1 | New-NetIPAddress –IPAddress 192.168.0.5 -DefaultGateway 192.168.0.1 -PrefixLength 24 -InterfaceIndex (Get-NetAdapter).InterfaceIndex |

- Set Primary and Secondary DNS Servers
1 2 3 4 | $PrimaryDNS = "192.168.0.5" $SecondaryDNS = "8.8.8.8" Set-DnsClientServerAddress -InterfaceAlias "Ethernet0" -ServerAddresses $PrimaryDNS,$SecondaryDNS |
Or
1 | Set-DNSClientServerAddress –InterfaceIndex (Get-NetAdapter).InterfaceIndex –ServerAddresses 192.168.0.5 |

Verify TCP/IP Setting
- To verify that the settings have been applied correctly, you can use PowerShell cmdlets to check the network configuration:
1 | ipconfig /all |

Step 2: Install the AD DS Role and Feature
- Run the following PowerShell command to install the AD DS role:
1 | Install-WindowsFeature -Name AD-Domain-Services -IncludeManagementTools |


Step 3: Promote the Server to a Domain Controller 2. Create New Forest:
- Use the following PowerShell command to promote the server to a domain controller:
1 2 3 4 5 6 7 8 9 10 11 12 13 | Install-ADDSForest ` -SafeModeAdministratorPassword (ConvertTo-SecureString "P@ssw0rd" ` -AsPlainText -Force) ` -DomainName "welcomeadmin.local" ` -DomainNetbiosName "welcomeadmin" ` -ForestMode "WinThreshold" ` -DomainMode "WinThreshold" ` -CreateDnsDelegation:$false ` -InstallDns = $true ` -DatabasePath "C:\Windows\NTDS" ` -LogPath "C:\Windows\NTDS" ` -SysvolPath "C:\Windows\SYSVOL" ` -Force:$true |
Or
1 2 3 4 5 6 7 8 9 10 11 12 13 14 15 16 | $Params = @{ DomainName = 'welcomeadmin.local' DomainNetbiosName = 'welcomeadmin' ForestMode = '7' DomainMode = '7' CreateDnsDelegation = $false InstallDns = $true LogPath = 'C:\Windows\NTDS' DatabasePath = 'C:\Windows\NTDS' SysvolPath = 'C:\Windows\SYSVOL' NoRebootOnCompletion = $true SafeModeAdministratorPassword = (ConvertTo-SecureString "P@ssw0rd" -AsPlainText -Force) Force = $true } Install-ADDSForest @Params |
- Windows Server 2003: “2” or “Win2003”
- Windows Server 2008: “3” or “Win2008”
- Windows Server 2008 R2: “4 or “Win2008R2”
- Windows Server 2012: “5” or “Win2012”
- Windows Server 2012 R2: “6” or “Win2012R2”
- Windows Server 2016, 2019, 2022: “7” or “WinThreshold”

- After the installation completes, restart the server to apply the changes.


Verify Installation
To ensure that Active Directory Domain Services is installed correctly, you can perform the following to
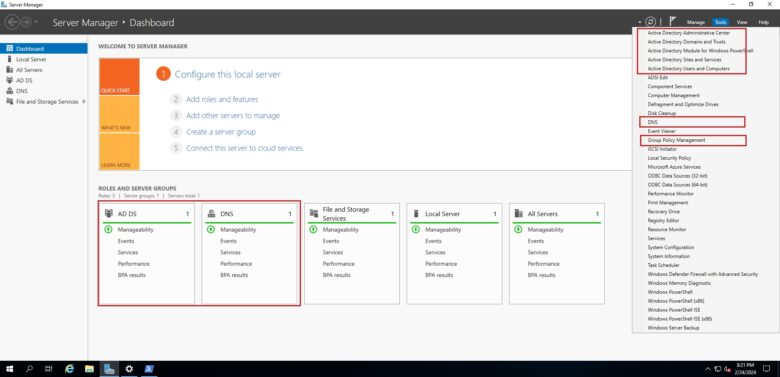
Check AD DS Installation:
- Open PowerShell as Administrator.
- Run the following command to import the Active Directory module:
1 | Import-Module ActiveDirectory |
- Run the following command to verify that the AD DS role is installed:
1 | Get-WindowsFeature -Name AD-Domain-Services |

Verify Domain Creation:
- On the server, open Server Manager.
- Navigate to Tools > Active Directory Users and Computers.
- In the Active Directory Users and Computers window, expand the “welcomeadmin.local” domain to verify its existence.
Check DNS Configuration:
- Open PowerShell as Administrator.
- Run the following command to check DNS settings:
1 | Get-DnsServerZone | Where-Object { $_.ZoneName -eq "welcomeadmin.local" } |

Test Domain Controller Functionality
- Join a test machine to the “welcomeadmin.local” domain to ensure that domain controller functionality is operational.
Congratulations! You have successfully installed Active Directory Domain Services with a new forest named “welcomeadmin.local” using PowerShell. Perform the verification steps to ensure that everything is configured correctly.
